My Inspiration:
My Reality:

1. When taking the doors down, it’s a good idea to label them so you know exactly where they came from and don’t have to play guess which door goes where. I just kept them organized in my head. However, the downfall to this system is that I was the only one allowed to move them. Anyway, use whatever method you think would work best. While taking them down pull all the old hardware off and SAVE IT in a bag. Why? Because I thankfully had the foresight to check that my new hard ware would fit and found that I had to use the old shallow screws for the hinges, and needed to buy new shorter screws for the handles because my old cabinet doors are thin. Now, that we’re getting to hardware . . .
2. My old handles happened to be a stupid length apart, and I couldn’t find anything that I liked to fit said stupid length. So I decided to buy the ½” longer ones that I liked and were even on sale. To fix this screw length conundrum, we bought the smallest dowels at Home Depot and sawed them to fit in the original holes (We filled one hole per door.) We then hammered them in flush with the wood, and used wood putty on both sides to fill the remaining gap. When they’re dry, sand them and apply one more layer of putty. We then drilled a new hole the right distance from the remaining hole. Drill from FRONT TO BACK. Wood will splinter as you drill, you want that on the back of the door, not the front!
3. I had hubby drill the new holes (He’s a perfectionist who measures and re-measures, and I’m the creative one who’s too impatient and always messes it up. We make a perfect team!) After that, we had a sanding party. We bought the medium grit sanding blocks and did a quick sand front and back, then wiped down with damp old t-shirts. I know everyone hates sanding, but kitchen cabinets get handled A LOT. Isn’t it better to make sure all your work is protected to the best of your ability?! Plus, if you REALLY hate sanding, why in the world are you using this distressing technique?!
4. I bought 3 paints. One brown underneath color, one white top color, and one fast drying water based polycrylic from Minwax. The high gloss Minwax was half the price of semi, so I opted for cheaper and it turned out great. I also like shiny things, so it works for me! I bought our paint from Walmart, maybe not the brightest idea. The girl told me she basically taught herself how to mix paint and after various other stories she shared, I thought she might not be the best person to buy paint from, but I’m too nice and bought it anyway. You want to get satin finish, not eggshell, as this will help the colors to not bleed into one another. Oil based is probably easier to sand, but I ended up with latex (Thanks crazy paint lady!) It sanded fine and at least I didn’t have to clean up with mineral spirits, so really, both types of paint work. You could even buy spray paint and spray paint clear lacquer for the top coat. I just didn’t want crazy fumes and paint spraying everywhere since I had a fan on to keep me cool. Did I mention I painted in the dead of summer? Crazy hot sauna conditions, but I think I lost a little weight!! (Too bad I drank it all back. Yes I said “drank.” You would crave a nice beer or cocktail after all this work in a hot garage too!) We made our own ghetto rigged painter’s blocks by using random boxes and 2x4s that were lying around and covered the area in disposable painter tarps. If you’re a perfectionist, buy the painter blocks, our way created imperfections, but it worked with the distressed look.
5. Paint the back of the cabinet first with each step, this leaves the front with less imperfections! I painted 2 coats of brown with a couple hours dry time in between, and the next day flipped it over and did the front of the cabinet. (Ps, this is a time consuming project that will take up your garage for at least a two weeks. If you can do it in less time, kudos to you and come teach me your tricks!) I then did the same thing with 2 coats of white. Wait a couple hours to start sanding. The paint should be thoroughly dry, but still easy enough to sand. I used medium grit sanding blocks and focused on the edges (Corners especially,) around the knobs, and in my case, down the vertical lines. I also chose spots at random to sand down to the brown. These spots were typically the thinner areas of white that looked easiest to sand to brown. The trick is to sand to the brown, but not over do it so that you sand the brown off too. Sufficient drying times in between the brown and white coats really help with that! Also, be sure to paint nice thin coats so you don’t have drip blobs on the edges, trust me, they’re not fun to sand off!! Use VERY THIN coats on your drawers. Mine are concave so they held paint really well and took FOREVER to sand!!!

6. I then used the dry stain technique. Since I was being cheap, I mixed one part brown paint to 3 parts water to make my “stain”. I typically hate exact measurements, but if you run out, you want it to look the same, right? Be sure to stir this “stain” periodically, as the paint will settle. I used a thin angled brush to get in the vertical lines, and a nasty old dollar brush for everywhere else. The nastier the better as this means it will give you a varied look, which is what you want! Dip the brush in the stain and blot it off on an old t-shirt. Go around the sides, or wherever you’re distressing, then gently blot or wipe (whichever technique looks better for your project) with a damp clean t-shirt. Do this in stages of paint and dab, paint and dab, as the stain dries quickly. If you don’t like it, wipe it off right away, it should come off easy if your damp rag is clean. I basically went over the areas I distressed with this technique, plus a little more. The more stain you use, the dirtier it will look. Use at your own discretion. I personally like distressed but clean.
7. After this, I used the paint speckle trick. Dip the brush in stain and blot lightly, then tap the base of the paint brush head against something hard, like a screw driver, or paint stick over small areas. Dab gently, don’t wipe, with a damp rag to pick up the blobs, but leave the paint circles. Use this technique sparingly and in different places to keep it looking naturally aged. I didn’t do this technique on all the doors and drawers. For vertical areas, use a toothbrush dipped in the stain and run your finger over the bristles to splatter. Use gloves for that technique. I got tips 6 & 7 from http://www.prettyhandygirl.com/2010/09/aging-is-so-distressing-techniques-for.html this lady is an aging master! I don’t think she would like that title though.

8. Once dry, take some doors and drawers to the kitchen and make sure it’s the look you want in the right light before you seal it! This step is important!!!! This is how I realized that the bottom doors were WAY darker than the top ones. (Remember that tip about using a clean damp rag to wipe? Well, I learned that lesson for you the hard way!) If you run into this problem you can fix it by re-sanding everything and re-doing your stain techniques, or, if it’s really bad, paint one light coat of white on top and redo your distressing technique. Don’t get disheartened! It’s a long process, but so rewarding when you just stand and stare at your finished cabinets. Yes, I really do stand and stare. It was hard work and someone has to appreciate it excessively!Side note-The backs of my doors had brown paint smudged on them, but since perfection wasn’t what I was going for and I was tired of all that hard work, I left it. This probably could have been fixed with a few quick swipes of white on the offending areas, but I was too lazy to fix it, so I played it off as a cool new aging technique!
9. When satisfied with your finish, break out your Minwax!


10. Let your doors and drawers cure for about a week to play it safe and go easy while your frame is curing too. My husband and I worked on the tile backsplash while we were waiting. I’m impatient and have to plan out distractions! When you’re ready to attach the hardware, you might need to re-drill your holes as the paint probably dripped into them. Again, drill front to back!! After this is done, you’re ready to hang them and admire your finished project!

Before:

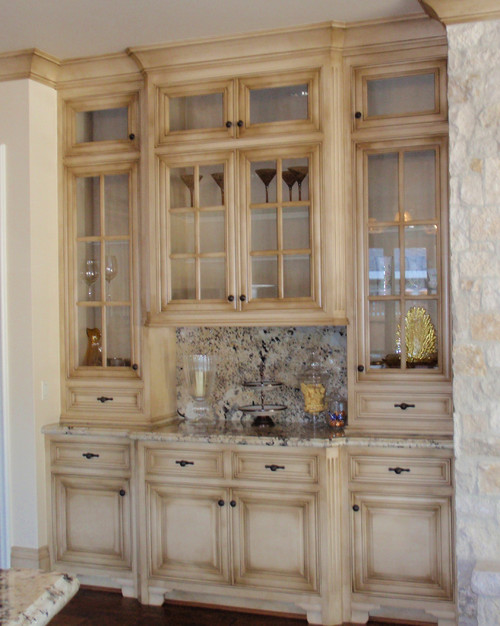
After:


